I started by removing the spider and secondary mirror assembly, which are held by four recessed screws and nuts on the inside (which should not be dropped onto the primary mirror):
 |  |
| Four screws hold the SkyWatcher 130M spider | SkyWatcher 130M (SK1309EQ2) secondary mirror |
By the time I finished, I realised it probably wasn't essential to remove the secondary like this, but it does make dealing with the four nuts at the other end of the tube easier! Once the four retaining screws in the curved side of the bottom piece are removed (again, taking take not to drop the nuts on the mirror), the whole mirror cell can be removed. This comes in two parts joined by the three collimation screws - separated by rubber 'O' rings (about 5mm as a pair):
 |  |
| SkyWatcher 130M (SK1309EQ2) ring for primary mirror, showing one of four tube attachment holes (top left) and one of three flanges for collimation screws | SkyWatcher 130M (SK1309EQ2) primary mirror, showing one of three mirror clips (right) and one of three collimation screws & locking screws |
I'd intended to follow the method on this thread moving the mirror of the SkyWatcher 130P, replacing the collimation screws with longer bolts, and the rubber 'O' rings with 2cm long compression springs (specifically the SC229 springs from www.strutdirect.co.uk). However, once I'd taken it apart I realised the SkyWatcher 130M has a differently mounted mirror.
 |
| SkyWatcher 130P primary mirror modification (image originally posted by geppetto) |
Here is my schematic of the original arrangement (left) and how I moved the mirror up the tube (right) by about 3cm. The basic idea is to put the mirror mounting plate (shown in blue) above the mounting ring (shown in green), allowing enough room for the four nuts used to attach the ring to the main tube:
 |  |
| Diagram showing SkyWatcher 130M (SK1309EQ2) primary mirror attachment. | Diagram showing modified SkyWatcher 130M primary mirror attachment, moving it about 3cm |
The collimation screws' holes in the mounting plate are not threaded (although the neighbouring lock screws do have threaded holes), so I have put washers either side of this in the hope that when I turn the new longer collimation screw (35mm M5 thread) in the threaded hole on the flange of the mounting ring this will move the mirror. We shall see.
Simply reusing the existing rubber 'O' rings seems to work (they are glued onto the flange so must be carefully peeled off in order to use them on the other side of the flange). A very short spring might work instead...
 |  |
| Replacement collimation screw with rubber 'O' ring, nut and washer ready for the mirror plate... | Reassembled mirror cell post modification, filing by yellow tape aligns to the main tube's seam. |
As my diagram tried to suggest, it is a pretty tight fit to get the mirror's mount disk inside the main tube. I had to file it down 1mm or so in places, and more at the seam of the tube. You can see this as the shiny edge in the photo above by the yellow marker tape - I may need some mat-black paint to cover this. Despite this, there is now a lot more light leaking into the end of the tube - a new cover might help?
And here's an exterior shot of the reassembled telescope tube - having moved the mirror like this makes it really quite easy to place the four nuts and bolts, but they do restrict the mirror placement - I've had to move it higher than I originally intended.
 |  |
| SkyWatcher 130M before modification, note the plate is flush with the ring. | SkyWatcher 130M after modification, note you can reach the ring nuts etc. |
You might notice that I've left the old collimation lock screws in place - I'm intending to try using them like this with fingers/pliers to turn them. It might work?
If this alternative mounting doesn't work that well in practise, I'm now less nervous about the simpler option of simply cutting an inch off the end of the tube itself. With a suitable saw I think that would actually be more straightforward (but irreversible).
I'm waiting for a clear night to test this out, and attempt to re-collimate the telescope. Fingers crossed for some nice astrophotography results with my Canon EOS DSLR directly attached. From some daylight testing it does seem like I will need an extension tube for some of my eyepieces now - I really should have ordered one before.
I'll direct any discussion to this thread on the StarGazersLounge.com forum.
Update (21 April)
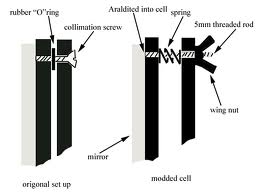
I did get a chance to test the initial modification, and took a couple of photos of the Moon and Jupiter, but it was too windy to really examine the performance on stars. Comments on the this thread reinforced my worry about too many moving parts with the extra nuts, so I'm trying out an alternative arrangement using springs. The trick here is I've cut a slot into the end of the bolts which can then be turned from the outside with a flat screwdriver for collimation adjustments.
|  |
| Diagram showing SkyWatcher 130M (SK1309EQ2) primary mirror attachment (pre-modification) | Diagram of SkyWatcher 130M using springs for primary mirror attachment, moving it just over 3cm |
|  |
| Original SkyWatcher 130M modification re-using the rubber 'O' rings for the mirror | Revised SkyWatcher 130M modification using springs to mount the mirror |
Again, please post any discussion on this thread on the StarGazersLounge.com forum.
Hi,
ReplyDeleteI'm having same issues as described here :) Did moving mirror up helped?
Yes, moving the mirror has helped in that I can now get focus with the Canon EOS DSLR, and tried this on the moon and a few tries of star clusters. I think I need to learn how to re-collimate the mirrors for best results, which I'll try after summer is over and the nights are darker.
DeleteThanks, Peter.
ReplyDeletehi peter how did you move the mirror up by as i think in mite cut the tube to make collimating easier thanks
ReplyDeleteI changed how the mirror was mounted in order to move it - the diagrams tried to explain this.
DeleteIf you have a suitable saw and drill, cutting the tube is perhaps easier. I have read about other people report doing this on astronomy forums.
Sorry should of asked how much did you move the mirror up the tube or how much would cut off lol thanks
ReplyDeleteAs noted about, initially I moved it about 3cm (30mm) but after the second adjustment it had moved 33mm. This was more than enough but was constrained due to the existing screws.
DeleteIf cutting it, I wrote about that I'd use about an inch (25mm or so), which I think I'd read on one of the astronomy forums. Double check this before cutting ;)